I'm not a big plain water person. Or, more accurately, I wish I didn't have to be a big plain water person. Now that I'm off the crack (cherry coke, that is), I don't typically find myself with a lot of beverage options. Switching to another soda makes no sense, I'm not a coffee or tea person, and milk is a big no-no for me. As for all those "weird" drinks...Sobe Life Water? Crystal Light? Propel? I generally don't trust anything that my great-grandma wouldn't recognize as edible. If you like your kool-aid mix, then drink up, my friend. I'm just talking about me here.
I kind of wish I liked fruit juice more, but in large doses, I generally find it too overpoweringly sweet. I torture myself with orange juice daily for the potassium, but that's as far as I'll go with that. But in the vast kingdom of fruit juices, there is one (actually 2) that I really do like - especially because I make it myself from scratch to suit my own taste: lemonade and limeade.
Making lemonade turns a plain bowl of turkey chilli into a "special lunch" (although your chili is super-special anyway, Jason!) And, it takes like 5 minutes to mix up a little 3-cup jug. That's only 4.5 minutes longer than it would take to get yourself a glass of cherry coke (and you might get to keep your teeth a little longer!)
So here's the big recipe: (ps - remember, this suits my tastes...you may want to add more sugar or a little less water if you like a more intense flavor!)
Juice 3 lemons or 4 limes (this will get you about 1/2 cup juice). I like to put the juice in a sports bottle, because I'm fancy like that, and I add about 4 Tbsp of sugar, then shake it, shake, shake it.... until it's all mixed in. Then I pour in 2 1/2 cups of water and shake it again (oh yeah, lids are handy for that shaking up part...that's why it's in the bottle in the first place. But you already figured that out because, since you're reading this blog, I assume you're quite smart.) It makes about 3 servings. Enjoy!
11 Spring Street
This blog is a collaborative collection of the stuff we all make at home, and want to share. We share sewing, baking, craft stuff, home decorator projects, sculpting, painting, gardening, photography, scrapbooking, music, and anything else we want to throw down for viewing or listening (whether we consider it a success or not).
Tuesday, February 7, 2012
Saturday, December 3, 2011
Fancy-Pants Advent Calendar
Merry (almost) Christmas! Since almost all my craftiness has given way to knitting, I thought I'd take this chance to post something non-knitting related (well, mostly anyway) since it doesn't happen to often that I make something that doesn't involve yarn and needles. This year, instead of the open-up-the-doors-to-reveal-a-small-piece-of-waxy-chocolate-like-substance advent calendars, I thought we'd try something new. A homemade, and much more exciting version!
Bought small treats of all sorts, put them in little Christmas-themed bags and strung them on a red ribbon in our hallway. I thought I was going to put them across the fireplace mantel until I attempted it and the weight of some of the bags made it too heavy to get it to stay attached. I thought I was being very fancy until I looked on Facebook an hour later and saw that my cousin (who moved away when she was 12 and I was 9, but somehow we grew up still able to send each other psychic-craft vibes) in Florida had the exact same idea this year. Only difference was that hers is way cuter, and I may have to steal this idea if we do it again next year (which at this point seems pretty definite.) She said she bought her little Christmas-y socks out of the dollar bin, but her friend had put one up using a boat load of socks crocheted by her grandma. I could knit 24 socks for an advent calendar, but that would probably take me an entire year if I got started right this minute.
My cousin's advent calendar has little number tags so the kids know exactly which sock to get into each day, while I let mine be a random string of bags and we let the kidsfight over figure out together which one they want to open each day.
Anyway, inside the bags/socks there have to be treats! I went with both edible and non-edible things. Anything from a couple pieces of candy to granola bars and dried fruit (I know this seems overly health-foodie of me, but my kids actually go crazy when I buy dried fruit). I have a few non-edible things like some mini invisible-ink books and little cards that give them extra computer time that day. I still have about 10 bags I need to fill before the middle of the month, so I'm going to hit the dollar bins and look for some small things while I'm out shopping. They both love Legos, so I'm going to put a couple mini figures in there, maybe have a bag with a card for each of them to pick out a couple new songs for their mp3 players from Amazon.com, and maybe a bag with a card saying that tonight will be pizza & board game night with the whole family. I still need to think of a few ideas, so if you've got one, leave it in the comments section!
Bought small treats of all sorts, put them in little Christmas-themed bags and strung them on a red ribbon in our hallway. I thought I was going to put them across the fireplace mantel until I attempted it and the weight of some of the bags made it too heavy to get it to stay attached. I thought I was being very fancy until I looked on Facebook an hour later and saw that my cousin (who moved away when she was 12 and I was 9, but somehow we grew up still able to send each other psychic-craft vibes) in Florida had the exact same idea this year. Only difference was that hers is way cuter, and I may have to steal this idea if we do it again next year (which at this point seems pretty definite.) She said she bought her little Christmas-y socks out of the dollar bin, but her friend had put one up using a boat load of socks crocheted by her grandma. I could knit 24 socks for an advent calendar, but that would probably take me an entire year if I got started right this minute.
My cousin's advent calendar has little number tags so the kids know exactly which sock to get into each day, while I let mine be a random string of bags and we let the kids
Anyway, inside the bags/socks there have to be treats! I went with both edible and non-edible things. Anything from a couple pieces of candy to granola bars and dried fruit (I know this seems overly health-foodie of me, but my kids actually go crazy when I buy dried fruit). I have a few non-edible things like some mini invisible-ink books and little cards that give them extra computer time that day. I still have about 10 bags I need to fill before the middle of the month, so I'm going to hit the dollar bins and look for some small things while I'm out shopping. They both love Legos, so I'm going to put a couple mini figures in there, maybe have a bag with a card for each of them to pick out a couple new songs for their mp3 players from Amazon.com, and maybe a bag with a card saying that tonight will be pizza & board game night with the whole family. I still need to think of a few ideas, so if you've got one, leave it in the comments section!
Friday, October 28, 2011
Name that hat!
I sure am happy that I asked for help on this one! I was totally stuck trying to figure out a name for my latest knitting pattern, but after I asked for help on my Facebook page yesterday, sixteen people chimed in with plenty of fun names to choose from! Now the hard part: we need to narrow it down to one. Please vote for your favorite and feel free to share a link to this post on your own Facebook wall so your friends and family can get in on the vote!
Wednesday, October 12, 2011
More Sock Monkeys
So I've learned something over the past year: some people LOVE sock monkeys. When my photographer friend, Kara asked me to make her a sock monkey hat she could use with babies that she photographs, I didn't quite "get it". I asked her, "So you want a hat that looks like a sock monkey head on top of the baby's actual head?" She insisted that she has seen pictures on the web and that it was cute, so I trusted her. I wasn't able to find a knitting pattern to make one (all the patterns available at the time were crocheted) so I thought I'd see what I could come up with on my own. I've had the pattern up for sale for a little over a year now and of the 756 sales I have so far in my Etsy shop, I bet the sock monkey hat pattern is at least 400 of those sales. So I'm glad I listened to Kara on this one because I'm 100% sure it never would have occurred to me to design such a thing without her suggestion!
I've been hard at work for the past 6 weeks trying to catch lightening in a bottle again. My sock monkey hat customers are by far my friendliest customers and I have received more e-mails than I can count over the past year from them. Many times, they're just complimenting the hat & saying it's the best one they've seen. Lots of people have told me they like my pattern because it's "not creepy like lots of sock monkeys are". And I've had a hand-full of people ask me to design other patterns to go with the hat, most often a matching sweater.
I thought about the design for a long time because I couldn't quite see it in a way where it wasn't over-the-top gaudy. In the end, I decided to write a pattern that would give the knitter 3 options: first, they could just knit the roll-neck raglan in "sock monkey colors" and be done with it. Option 2 is to do the duplicate-stitch design (shown on the baby) to make a small monkey face on the chest. And option 3 is to make an intarsia square that you then crochet (or sew) onto the sweater front. So, 3 options for varying levels of how much you want your sweater to scream "SOCK MONKEY!" and 3 options for level of difficulty (for the record, this is as easy a sweater pattern as you'll ever find and the only thing I consider remotely difficult is the intarsia square option.) I hope people like it!
Now I'm working on re-writing the hat pattern using the same yarn that I used for the sweater so people can truly make a matching set. I'm also adding 2 adult sizes to the hat pattern because it was previously written for newborn - preteen (I had no idea I'd get so many requests from people to help them modify the pattern for a teen or adult!) I have to have it done by the end of the month because I have a yarn shop owner near Madison, WI waiting for my sock monkey hat & sweater patterns. She is going to package them with yarn and sell the kits at a special event day the shops in her town have planned.
If you're a blog reader who plans to purchase the new sock monkey sweater pattern in October, use the code "11spring" at check-out to get $1 off!
Monday, August 29, 2011
Frame Collage
Second-hand frames, spray-painted chocolate brown and arranged as one gigundic "artwork": sounds simple, but this project took a looong time. First, I had to accumulate several frames. I got most of these at a second-hand store, and many of them didn't have hangers, glass, etc. and had to be cobbled a bit. When they didn't have glass, I used an exacto knife on some thick plastic that I had on an old hanging. Then I had to select the photos for each frame and develop them. I arranged them on the floor in a way that I liked, and they ended up in this "football" shape.
Hanging took a bit of time, using a leveller to get the frames as straight as I could. The frames were all different colors and remained that way for some time... Recently, I finally finished the project by taking everything out of the frames, and taking the frames to the backyard for two coats of spray primer, and two coats of paint. This will take all day, and as you have to do short spurts with spray-paint in order not to drip, it will cripple three fingers on each of your hands for approximately three days.
The whole project, with photos, frames, hardware and paint, cost me less than fifty bucks. Still, I recommend that you be not only thrifty, but clinically insane to attempt this many frames. Still, with 23 framed photos, this project could have easily cost me a few hundred bucks. Glad it's done!
Sunday, July 3, 2011
Tulle Flower Headbands
I've been seeing these tulle flower accessories everywhere and figured it couldn't be too hard or expensive to make your own. I picked up this one at Kohls on clearance for $2 for inspiration and studied it carefully. The back of this one has a bar pin back as well as a serrated hair clip glued to a metal disc so that you could pin it on your sweater OR clip it to your head.
The only real difference I can see between my flower and the one that I bought from Kohls in the first picture is that it looks like the tulle circles in that flower were cut with a scalloped edge.
Total time, about 15 minutes!
Edited to add: After viewing a few more tutorials online, most people are sewing down the folded points of the tulle onto the felt circle to secure it. This would take a little more time, but prevent the gluey mess. I'm going to try that next time!
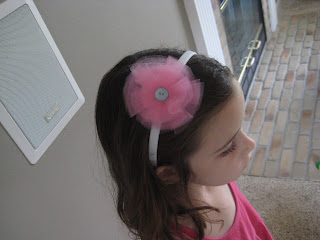
For my first attempt, I wanted to make something for my five year old daughter, so I thought I would try a hot pink flower and attach it to a headband. Here are the supplies I used:
10 discs of tulle cut into large circles (4 inches across)
10 discs of tulle cut into smaller circles (3 inches across)
2 round pieces of white felt (1.5-2 inches across) **Note** It is probably best to use a color of felt that closely matches your tulle color so that it isn't as noticeable under the tulle flower when finished.
Decorative beads or a button to glue into the middle
Headband (we already had one wrapped in white ribbon)
Hot glue gun
It's important to note that these tulle pieces need not be exactly circular. In fact, to save cutting time, I folded my tulle over and over and just cut out a big stack of 10 circles free hand all at once.
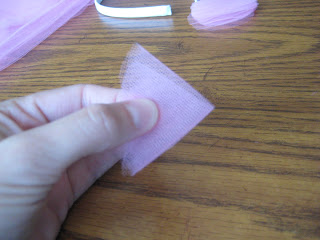
Starting with the larger tulle circles, I placed two one on top of the other and folded the disc in half like so.
Then I folded that in half again until I got a wedge shaped thingy-ma-jobbie like this:
Then I put a dab of glue in the inside corner where it comes to a point and pressed the point into the middle of one of the discs of white felt.
I repeated the same process for the remaining 8 large tulle circles, creating each "petal" using two layers of tulle and slightly over lapping them when gluing them down. The end result is a base layer of five petals that completely cover the white felt circle.
For the top layer, I did the exact same thing with the 10 smaller tulle circles. I wasn't too tidy with the glue considering that tulle fabric has holes all over it, so I was constantly getting gluey fingers when I'd try and press the petals down. The clump of glue left in the middle after I finished gluing all of the petals down was a little too substantial for the dainty pearl beads I had a mind to stick into the center, so instead I covered it up with a turquoise button to make it look a little more polished.
So now I had a tulle flower glued to a white felt circle. All that was left to be done was to sandwich a head band between that piece of felt and the other piece of felt, glue liberally....
...and VOILA!
Total time, about 15 minutes!
Edited to add: After viewing a few more tutorials online, most people are sewing down the folded points of the tulle onto the felt circle to secure it. This would take a little more time, but prevent the gluey mess. I'm going to try that next time!
Monday, June 20, 2011
Smock Dat
So I really wanted to knit something that used a "smocking" technique. My mom made me a "colonial girl" dress when I was 8 which I LOVED, and the best part of the dress was the smocked apron. It was white and had ruffles and was just adorable. So smocking makes me think of adorable little girl clothes.
Here's the hitch: I couldn't find any patterns I liked, and I didn't really know how to smock anyway. Well, let me tell you, there is just nothing in existence that you can't learn how to do from the internet. After an afternoon surfing the web, I knew enough to come up with my latest knitting pattern.
I'm so proud of this one that I assume you can hear the buttons popping off my shirt from miles around :)
Pin It
Subscribe to:
Posts (Atom)