Saturday, December 3, 2011

Fancy-Pants Advent Calendar

Merry (almost) Christmas!  Since almost all my craftiness has given way to knitting, I thought I'd take this chance to post something non-knitting related (well, mostly anyway) since it doesn't happen to often that I make something that doesn't involve yarn and needles.  This year, instead of the open-up-the-doors-to-reveal-a-small-piece-of-waxy-chocolate-like-substance advent calendars, I thought we'd try something new.  A homemade, and much more exciting version!

Bought small treats of all sorts, put them in little Christmas-themed bags and strung them on a red ribbon in our hallway.  I thought I was going to put them across the fireplace mantel until I attempted it and the weight of some of the bags made it too heavy to get it to stay attached.  I thought I was being very fancy until I looked on Facebook an hour later and saw that my cousin (who moved away when she was 12 and I was 9, but somehow we grew up still able to send each other psychic-craft vibes) in Florida had the exact same idea this year.  Only difference was that hers is way cuter, and I may have to steal this idea if we do it again next year (which at this point seems pretty definite.) She said she bought her little Christmas-y socks out of the dollar bin, but her friend had put one up using a boat load of socks crocheted by her grandma.  I could knit 24 socks for an advent calendar, but that would probably take me an entire year if I got started right this minute. 

My cousin's advent calendar has little number tags so the kids know exactly which sock to get into each day, while I let mine be a random string of bags and we let the kids fight over figure out together which one they want to open each day. 

Anyway, inside the bags/socks there have to be treats!  I went with both edible and non-edible things.  Anything from a couple pieces of candy to granola bars and dried fruit (I know this seems overly health-foodie of me, but my kids actually go crazy when I buy dried fruit).  I have a few non-edible things like some mini invisible-ink books and little cards that give them extra computer time that day.  I still have about 10 bags I need to fill before the middle of the month, so I'm going to hit the dollar bins and look for some small things while I'm out shopping.  They both love Legos, so I'm going to put a couple mini figures in there, maybe have a bag with a card for each of them to pick out a couple new songs for their mp3 players from Amazon.com, and maybe a bag with a card saying that tonight will be pizza & board game night with the whole family.  I still need to think of a few ideas, so if you've got one, leave it in the comments section!

Friday, October 28, 2011

Name that hat!

I sure am happy that I asked for help on this one!  I was totally stuck trying to figure out a name for my latest knitting pattern, but after I asked for help on my Facebook page yesterday, sixteen people chimed in with plenty of fun names to choose from!  Now the hard part: we need to narrow it down to one.  Please vote for your favorite and feel free to share a link to this post on your own Facebook wall so your friends and family can get in on the vote!


Wednesday, October 12, 2011

More Sock Monkeys

So I've learned something over the past year: some people LOVE sock monkeys. When my photographer friend, Kara asked me to make her a sock monkey hat she could use with babies that she photographs, I didn't quite "get it". I asked her, "So you want a hat that looks like a sock monkey head on top of the baby's actual head?" She insisted that she has seen pictures on the web and that it was cute, so I trusted her. I wasn't able to find a knitting pattern to make one (all the patterns available at the time were crocheted) so I thought I'd see what I could come up with on my own. I've had the pattern up for sale for a little over a year now and of the 756 sales I have so far in my Etsy shop, I bet the sock monkey hat pattern is at least 400 of those sales. So I'm glad I listened to Kara on this one because I'm 100% sure it never would have occurred to me to design such a thing without her suggestion!

I've been hard at work for the past 6 weeks trying to catch lightening in a bottle again. My sock monkey hat customers are by far my friendliest customers and I have received more e-mails than I can count over the past year from them. Many times, they're just complimenting the hat & saying it's the best one they've seen. Lots of people have told me they like my pattern because it's "not creepy like lots of sock monkeys are". And I've had a hand-full of people ask me to design other patterns to go with the hat, most often a matching sweater.

I thought about the design for a long time because I couldn't quite see it in a way where it wasn't over-the-top gaudy. In the end, I decided to write a pattern that would give the knitter 3 options: first, they could just knit the roll-neck raglan in "sock monkey colors" and be done with it. Option 2 is to do the duplicate-stitch design (shown on the baby) to make a small monkey face on the chest. And option 3 is to make an intarsia square that you then crochet (or sew) onto the sweater front. So, 3 options for varying levels of how much you want your sweater to scream "SOCK MONKEY!" and 3 options for level of difficulty (for the record, this is as easy a sweater pattern as you'll ever find and the only thing I consider remotely difficult is the intarsia square option.) I hope people like it!

Now I'm working on re-writing the hat pattern using the same yarn that I used for the sweater so people can truly make a matching set. I'm also adding 2 adult sizes to the hat pattern because it was previously written for newborn - preteen (I had no idea I'd get so many requests from people to help them modify the pattern for a teen or adult!) I have to have it done by the end of the month because I have a yarn shop owner near Madison, WI waiting for my sock monkey hat & sweater patterns. She is going to package them with yarn and sell the kits at a special event day the shops in her town have planned.

If you're a blog reader who plans to purchase the new sock monkey sweater pattern in October, use the code "11spring" at check-out to get $1 off!

Monday, August 29, 2011

Frame Collage


Second-hand frames, spray-painted chocolate brown and arranged as one gigundic "artwork": sounds simple, but this project took a looong time. First, I had to accumulate several frames. I got most of these at a second-hand store, and many of them didn't have hangers, glass, etc. and had to be cobbled a bit. When they didn't have glass, I used an exacto knife on some thick plastic that I had on an old hanging. Then I had to select the photos for each frame and develop them. I arranged them on the floor in a way that I liked, and they ended up in this "football" shape.

Hanging took a bit of time, using a leveller to get the frames as straight as I could. The frames were all different colors and remained that way for some time... Recently, I finally finished the project by taking everything out of the frames, and taking the frames to the backyard for two coats of spray primer, and two coats of paint. This will take all day, and as you have to do short spurts with spray-paint in order not to drip, it will cripple three fingers on each of your hands for approximately three days.

The whole project, with photos, frames, hardware and paint, cost me less than fifty bucks. Still, I recommend that you be not only thrifty, but clinically insane to attempt this many frames. Still, with 23 framed photos, this project could have easily cost me a few hundred bucks. Glad it's done!

Sunday, July 3, 2011

Tulle Flower Headbands

I've been seeing these tulle flower accessories everywhere and figured it couldn't be too hard or expensive to make your own.  I picked up this one at Kohls on clearance for $2 for inspiration and studied it carefully.  The back of this one has a bar pin back as well as a serrated hair clip glued to a metal disc so that you could pin it on your sweater OR clip it to your head. 


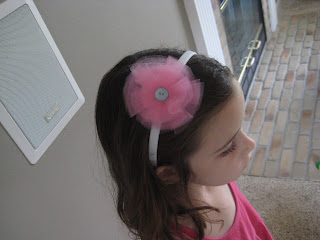
For my first attempt, I wanted to make something for my five year old daughter, so I thought I would try a hot pink flower and attach it to a headband.  Here are the supplies I used:


10 discs of tulle cut into large circles (4 inches across)
10 discs of tulle cut into smaller circles (3 inches across)
2 round pieces of white felt (1.5-2 inches across) **Note** It is probably best to use a color of felt that closely matches your tulle color so that it isn't as noticeable under the tulle flower when finished. 
Decorative beads or a button to glue into the middle
Headband (we already had one wrapped in white ribbon)
Hot glue gun

It's important to note that these tulle pieces need not be exactly circular.  In fact, to save cutting time, I folded my tulle over and over and just cut out a big stack of 10 circles free hand all at once.   

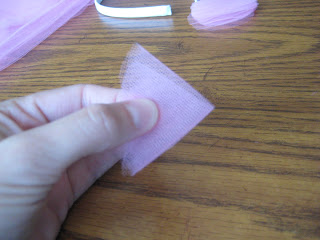
Starting with the larger tulle circles, I placed two one on top of the other and folded the disc in half like so.


Then I folded that in half again until I got a wedge shaped thingy-ma-jobbie like this:


Then I put a dab of glue in the inside corner where it comes to a point and pressed the point into the middle of one of the discs of white felt.


I repeated the same process for the remaining 8 large tulle circles, creating each "petal" using two layers of tulle and slightly over lapping them when gluing them down.  The end result is a base layer of five petals that completely cover the white felt circle. 


For the top layer, I did the exact same thing with the 10 smaller tulle circles.  I wasn't too tidy with the glue considering that tulle fabric has holes all over it, so I was constantly getting gluey fingers when I'd try and press the petals down.  The clump of glue left in the middle after I finished gluing all of the petals down was a little too substantial for the dainty pearl beads I had a mind to stick into the center, so instead I covered it up with a turquoise button to make it look a little more polished. 

So now I had a tulle flower glued to a white felt circle.  All that was left to be done was to sandwich a head band between that piece of felt and the other piece of felt, glue liberally....


...and VOILA!


The only real difference I can see between my flower and the one that I bought from Kohls in the first picture is that it looks like the tulle circles in that flower were cut with a scalloped edge. 

Total time, about 15 minutes!

Edited to add: After viewing a few more tutorials online, most people are sewing down the folded points of the tulle onto the felt circle to secure it.  This would take a little more time, but prevent the gluey mess.  I'm going to try that next time!

Monday, June 20, 2011

Smock Dat

So I really wanted to knit something that used a "smocking" technique. My mom made me a "colonial girl" dress when I was 8 which I LOVED, and the best part of the dress was the smocked apron. It was white and had ruffles and was just adorable. So smocking makes me think of adorable little girl clothes.

Here's the hitch: I couldn't find any patterns I liked, and I didn't really know how to smock anyway. Well, let me tell you, there is just nothing in existence that you can't learn how to do from the internet. After an afternoon surfing the web, I knew enough to come up with my latest knitting pattern.

I'm so proud of this one that I assume you can hear the buttons popping off my shirt from miles around :)
Pin It

Wednesday, May 4, 2011

My Crafty Soul Mate


You knew the quilting thing was just a short distraction, didn't you? An affair, as it were. Now I'm back with my "steady", my soul mate: knitting.

I've been working on the Ellie Dress pattern for more than a month now. It took forever because 1) I wanted to offer it in 8 different sizes. That means lots of test-knitting so I know my math is correct in all the different sizes.
2) The front of the bodice was written as a chart instead of as written instructions. This means I had 8 different charts to write to show the argyle pattern in each size. If I never see another Excel spreadsheet full of charting icons, it will be too soon.


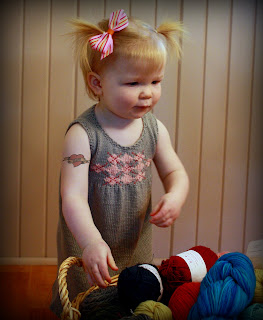
Today my friend Melodee came over with her little girl and after some initial suspiciousness on the part of my little model, she warmed up and we got some great shots. By the way, that tattoo is totally real and not at all photo shopped onto her little arm. Can you believe that?! Anyway, I may not have eaten lunch until 2 this afternoon, but I managed to get in a photo shoot, a visit to the gym, an hour's worth of photo editing and finishing up the pattern, then writing the listings for my Etsy shop and for Ravelry. It's kind of like that army thing: "We do more before breakfast than you do all day..." or something like that.

Thursday, April 21, 2011

Baby Clothes Name Blanket


Let me start here by saying this project is a surprise birthday gift for my daughter next week. So if anyone that reads this spills the beans before I have a chance to give it to her the day after Easter, just go ahead and expect me to show up at your door to administer a beat-down for leaking this out of our little Craft Cone of Silence. What is posted on the blog, stays on the blog. Until Monday, anyway.

But I digress...this story starts 8 1/2 years ago. I am pregnant with my daughter and since second babies don't usually get showers to celebrate their forthcoming arrival, I wanted to do something else special so this baby would know we were happily anticipating her appearance in the world. I stole an idea that my mom had at her baby shower for me: name squares. I passed out and mailed 8x8" squares of fabric to my (female, because we all know how most men are when you ask them to do something crafty...) friends & family and asked them to write a name on the square. I said it could be the name they think we should use for this baby or just their favorite baby name. This works best if you do it before you start blabbling the sex of the baby, because if you do that first, you're going to get a very one-sided blanket out of it. As a person who owns a name blanket, I always thought it was fun to see what names people liked, which people thought I was going to be a boy or a girl, and what names were popular at the time I was born.

After I got the name squares back, I embroidered them right away (I was still pregnant and still had free-time while my 2-year-old napped!) Then, I put them in a drawer....for 8 years.

In my defense, what started out as a name blanket, morphed into a "name and baby clothes" blanket somewhere in Maya's toddlerhood. I thought it would be cute to incorporate clothes she wore as a little girl into the quilt instead of just buying random fabric to patch the name squares together. So, I had to wait a while for her to outgrow her clothes and amass a large enough collection of things that were memorable and not too stained to use!

I went with a twin size because 1) that's the size her bed is right now, and because she has the small bedroom, it's not going to get any bigger, and 2) it's possible to machine-quilt a twin size (and probably even a fill size, but I wouldn't try it with a queen or larger.)

Since my name squares were 8x8", I cut out a matching square from heavy card stock to use as a pattern on the clothes. Many things (shirts, dresses) were easy to find a square to use, but other things (pants, diaper covers, shirts with logos too close to the neckline) took some creativity. On a few shirts, I ended up cutting out two squares, one from the back that I flipped around so the right side faces up, then one from the front that incorporated the neckline, then I sewed the two together so it was still a square, but I got all of the fancy neckline stuff in. If you enlarge the quilt picture, you can see a blue square that was a shirt with lots of necklaces sewn on it and a green jumper with a butterfly on it - both of these squares were done this way. There were also a few items that had cute logos (strawberry shortcake comes to mind) that were in a really inconvenient spot. So, I cut the logos out, cut my square of fabric from wherever worked best, then used my sewing machine as a serger and sewed that sucker back into place on the new square of fabric.

I picked two other challenging garments to picture here: the first is a floral top that had some stains on the front. I thought about using the back (it had cute pearl buttons all the way up the back) but I settled on the side because there's a bow, and my little girl loves her some bows. The side was slitted, so first I sewed up the slit, then cut out the square.

The second challenge was two diaper covers I saved from dresses Maya loved (I think I sold the dresses at a garage sale). They weren't big enough to give me an 8x8" square, so I cut the biggest triangles I could out of them, then sewed them together. After ironing the seam, I was able to cut out my 8x8" square.

For a twin size comforter, I needed 9 squares across and 12 squares going down each row. So, we're talking 108 different squares. As I was cutting squares, I realized I didn't have quite enough different clothes, so I also used a plain pink velour baby blanket, and I cut more than one square from a few of the larger-sized garments.

After you have all your squares ready, lay them out on the floor. You'd think that you could just randomly sew squares together for a "crazy quilt" like this, but I spent quite a few minutes moving squares around, breaking up the pink with other colors, trying to alternate the "logo & large picture" squares with the "plain or small pattern" squares, and I had a definite spot for each of the name squares (I put the ones from close relatives and friends in the middle, bottom & side that will show once it's on the bed. Squares from people Maya doesn't know as well went all the way at the top (often this part of the quilt is folded over, so these squares don't always show) and the side of the quilt that is tucked in against the wall when it's on the bed. Anyway, spend some time laying it out...you'll be glad you did.

I'm not going to go into a detailed description of how to sew together a quilt (if you're reading a craft blog, I'm going to assume a basic level of sewing competence here...if not, there are plenty of websites that will walk you through the process.)
I did machine quilt this tw
in-sized comforter. It's a challenge, but not impossible. It involves folding or rolling up the side that's smushed between the machine and the needle, and making sure you never have more than half the comforter on that side of the machine. It's a pain, yes, but it's more of a pain to quilt it by hand. Amen to that.

Slap a blanket binding around the border and you're good to go.

Can't wait for next week!


Pin It
 

Friday, March 25, 2011

DIY Princess Leia hair!

Boy, time for crafting has really gone by the wayside for me!  (And the rest of the contributors, I assume, based on the recent blog activity!)

I realize that this blog post won't have relevance for many of you out there, unless you have a Star Wars obsessed daughter like I do.  My darling 5 year old girl got ahold of my husbands old Star Wars toys circa 1979 about six months ago and hasn't looked back.  She talks at great length about power droids, the differences between a Cloud Car and a Sand Speeder, and asks why Padme Amidala's last name isn't Skywaker since she got married to Anakin.  She also frequently request that we all act out the characters as a family.  She usually asks me to be Darth Vader....I'm still not sure if that is a compliment or an insult.  Anyway, it sure beats playing Barbies every day!

She was recently invited to a neighborhood boy's Star Wars themed birthday party, and was told she could dress in character, if she wanted.  Um......YEAH!   She decided on Princess Leia (over Padme Amidala and Ahsoka Tano of the Clone Wars animated series) and I thought it would be fun if I could figure out a way to give her Leia's hairdo.  Her hair is pretty short these days, so I started to envision using brown earmuffs and making some buns out of yarn to attach to them.  Here's the end result.......


What's that you say?  You'd ALSO like to have some Princess Leia hair?  Well you are in luck because I created a tutorial so that you can make your own! 

Supplies needed for PLH (Princess Leia Hair)
  • A pair of earmuffs
  • 165 yards of brown yarn
  • Hot glue gun
  • A spool of brown grosgrain ribbon, either 5/8 in. or 7/8 in. width.  (optional)
  • The force
First, locate yourself some earmuffs.  I was trying to find the old school brown furry kind that you used to be able to buy for about a dollar.  The earmuff selection was sparse in my local stores in March, so I ended up with these bad boys.  The white part that is up against the ear is really too fluffy for optimal results, but it's all I had to work with. 


Since Leia does not have orange, purple and green stripes on the top of her head, I decided to wrap the headband part of the earmuffs in brown grosgrain ribbon, overlapping the ribbon and hot gluing it on the inside every time I looped it around.  I had about 100 spools of ribbon laying around my house (I'm a member of Girls Hairbow Makers Anonymous), but none plain brown.  I took a polka dot print and turned it so that the "wrong side" faced out, making it the right side.  What the what?  Refer to Exhibit A below.

Exhibit A

Next I took a strand of the brown yard and cut a length of 55 inches.  Then I did that 8 more times so that I had 9 pieces of yarn 55 inches long each.  Next I knotted one end very tightly to prepare the strands for braiding.  I realize that Leia's buns aren't really braided, but I couldn't think of another way to secure all of the strands of hair to the earmuffs with a glue gun without creating a huge, gluey gummed up mess.  If any of you in cyberland can improve upon this step, please share your ideas in the comments section at the end of this post!


It helps to have some tension on the yarn when you are braiding, so you can either find a willing participant to hold the knot while you braid, or you can stick a safety pin through the knot and pin it to your couch "friendship bracelet style"!


Braid all of the yarn until you get to the last two inches or so, then put a loose knot in that end in case you need to make adjustments later. 

Fire up your glue gun and have extra glue sticks handy - I used about two and a half for the entire project.  Take the braid end with the tight knot, squirt some hot glue in the center of the outside of one earmuff, and glue the knot down so that the braided yarn is flat, not on its' edge.  Then, start gluing the braid down flat in a spiral pattern taking care to ensure there are no gaps.


Keep going until you've nearly covered the whole earmuff with the braided yarn.  When you get near the end, you can take out the loose knot in the remaining end and adjust the yarn/braid longer or shorter, then knot it back together tightly.  Trim the ends of the yarn close to the knot, then tuck the knotted end partly under the rest of the braided area (or don't) and hot glue that sucker down.  The end result should look something like this.


Repeat this process on the other side.  Give them to your giddy daughter, or keep them for yourself to wear to Pick N Save/Kroger/Jewel on double coupon day!


May the force be with you!


Wednesday, February 9, 2011

Paper Bag Scrapbook

Greetings loyal blog readers!  I'm Natalie, a new contributor to 11 Spring Street, and am thrilled to share my craft/cooking/DIY successes (and many failures!) with all of you! 

I do not consider myself a scrapbooker.  The process of sorting, printing and arranging photos seems daunting to me, and with a 5 and 2 year old, I just don't feel like I can put that kind of time into one project at this point in my life.  I'm more of an "insert-photos-into-prearranged-layouts-and-purchase-a-book-through-Shutterfly" kind of gal.  The expense of all of the decorative do-dads, cutting/punching tools and paper has also been a deterrent for me to embrace this hobby.  However, for Christmas 2009, my Mom, Sister and I decided to do a handmade gift exchange.  I was racking my brain for an idea when I remembered some cute scrapbooks I had seen at a friends' house.  This friend, (let's call her Amy since that's her real name), told me that the book was constructed out of brown paper bags!  Yeah, that's right - the kind you can buy 100 of at Walmart for about $2.  I could hardly believe it and immediately knew this would be my gift idea for my Sister's Christmas present. 

I went home and Googled the term "paper bag scrapbook" and lots of links came up.  I've included a link to one tutorial that shows how to assemble the book, and one way of binding the edge.  To keep it simple, I decided to limit the photos for the book I made to those from the most recent calendar year.  Lucky for me, my sister had recently had some very nice family photos taken, and I had enough of my own photos of their family from the past year to supplement.  Basically, you cover the paperbag pages with scrapbook paper (card stock weight works best), design your layout, add photos & embellishments and voila!

I was super happy with the result, and although it did take me about 6-8 hours worth of work to finish up this bad boy, I have to think that it was a lot less time than a traditional "from scratch" 12x12 (or whatever the traditional size is) scrapbook. 

All in all, I spent about $40 on materials.  That included a large pack of fancy scrapbook paper, Mod Podge adhesive (more on this later....), embellishments, paper bags and photo printing.  Use those 40% of JoAnn Fabric coupons, of course!  Now, $40 might seem like a lot, but I have enough of the materials left over to probably make 2 additional books of the same size.  So, let's say the cost was closer to $15 for the one book. 

A few things I liked about this style of scrapbook vs. a traditional book:

1) The novelty of it being made out of paper bags!
2) The little pockets where you can tuck additional photos or momentos
3) The size - easier to leave out on a desk or table for people to actually see and enjoy

Here's a tip that I will share with you if you decide to make one of these books.  Use double sided tape to stick down things that need sticking.  I used an adhesive called Mod Podge to glue everything down that needed gluing.  Only later did someone suggest to me that you can also use double sided tape - DUH, why didn't I think of that??  I would definitely try that next time, as once in awhile the Mod Podge would seep out from under the edge of the item being glued and get on my fingers or worse, one of the photos, and kind of smear up the finish a little.  Additionally, and perhaps more importantly, using tape would eliminate all of the drying time required in between pages.

Here are some photos of the finished album I made.  Names have been removed to protect the innocent!


Front cover - I used an accordian-fold binding method, but you can punch holes along one edge and tie with ribbon, among other things


Here's an example of the pockets created by some of the pages and how you can tuck additional photos or momentos inside. 


Other hiding spots for additional photos can be created when you only glue/tape down three sides of the main photo on the page, as in the page on the left.  The photo behind it is on its own individal card that can be pulled out.   


Vellum and transfer letters came in super handy to create the look I wanted. 


Some of the additional photo cards I made for inserting into pockets within the book. 

I love the idea of making one of these for a kiddo for their birthday, or for a spouse to have on their desk at work. 

I'm greatly looking forward to seeing the projects of other contributors and hearing what our readers have to say!

 Happy crafting!

Sunday, February 6, 2011

Blizzard Socks

I am a total delinquent with this craft blog. If it makes you feel any better, I've been a total delinquent about most things for the last 6 months or so. It's to the point that a couple nights ago at dinner, my husband jokingly told me to write a letter of resignation from the chores I am abandoning, so he'll know what he needs to do to pick up the slack. (I say"jokingly" just because he wasn't mad about it, not jokingly as if he thought it wasn't true that I had decided to pawn off household chores on anyone who will do them.)

Anyway, I digress. I am finally back today to show you all what I've been up to.... You see, I caught this disease..."Knobsession", "Knitsession", er....I'm obsessed with knitting, ok? I can trace it back to the day last July that my photographer friend Kara (ps, check her out because she rocks) asked me if I could knit her a sock monkey with a matching hat to use ith babies in her photo sessions. I had never heard of such a thing and honestly, the idea of it didn't say "cute" to me. It said, "creepy baby picture that these babies will grow up to roll their eyes at and make fun of". But because Kara takes great pictures, I figured that she probably knew something I didn't, so I told her I'd give it a try.

I figured it would be easy enough to find a knitting pattern for a sock monkey hat on Ravelry.com (it's like facebook for knitters & crocheters). Kara had said that she had seen these hats "all over the internet", so there had to be patterns available, right? Well, that could be correct if I knew how to crochet, which I don't. I felt super-lucky when I finally found a site that listed a "Knitted Sock Monkey Hat" pattern. So happy, in fact, that I downloaded it immediately without allowing myself to believe that the site looked a little shady. What I actually ended up downloading was the virus that put the final nail in the coffin for our 6-year-old pc. What kind of monster attaches a computer virus to a KNITTING PATTERN, I say?!

Anyway, after that whole fiasco, and now in need of a new computer, I decided to write my own freaking pattern. Not that I had ever done that before, but I'm not one to shy away from a challenge. I found a sock monkey toy pattern here and made that sucker first while deciding how I was going to pull a matching hat out of thin air. In the end, I just figured out how to knit a basic earflap hat (which turned out to be not-so-hard, except for the part where I had to find children of friends in various sizes to fine-tune the sizing of the thing). Then I modified the face features from the sock monkey toy pattern so they would work with the size of face I was trying to create on the hat. Voila! Knitted Sock Monkey Earflap Hat Pattern was born and put up for sale at the end of July, and it's still the only one I can find on the internet (well, except for a few ugly "stocking cap" styles, but I'm not afraid of that competition!)

Since then, I think I've sold about 70 or 80 monkey hats to friends and in my etsy shop, and written 4 more patterns. Total sales at my etsy shop just topped 300 this week, and in honor of that (and being trapped in the house for 3 days because of the blizzard) I decided to write a pattern to offer up for free!

I've been wanting to do hand-knit socks, but my first few attempts were disappointing. Nothing more annoying than socks that don't stay up, or are baggy around the gussets (those are the little triangular sections on the left and right sides of your heel...the patterns I've encountered so far have not had nice, tight gussets!) So I decided I was going to write a pattern for The Best Fitting Socks Ever. And, here they are (drumroll, please......)

Nice, right? Look at those tops staying where they're supposed to be! Check out my nice, tight gussets! (Is it hot in here or is it just my socks?)
Anyway, I'm offering this pattern for FREE for the entire month of February, so if you want a copy, all you have to do is go to my etsy shop, click on the left sidebar where it says "Contact" and send me a message (including your e-mail address, so I know where to send the pattern!) saying that you saw the free sock pattern on the Sprint Street Blog. I'll be sending patterns out at least once a day, so you should get yours within 24 hours of contacting me!